
What is SharePoint Highlighter?
Highlighter is a custom column for use with all editions of SharePoint 2007, 2010, 2013 and 2016.
What does it do?
SharePoint Highlighter adds visual emphasis and definition to SharePoint list views with:
- Highlighting
- Icons
- Color coding
- Progress bars
- And countdowns
How to Install SharePoint Highlighter
Download the appropriate installation file and run from any SharePoint Web Front End (WFE) server.
Select the Highlighter button to install. You may wish to also install the License Manager at the same time.

The automatic installer will verify some prerequisites (such as the SharePoint administration service is running) and if everything is ok will Install and Deploy the web part to all Web Front End servers in your farm.
To remove the web part you can run the installer again and you will be given the option to remove.
Highlighter is a Custom Column and Custom Columns are classed as Farm Solutions in SharePoint. So if you want to check that Highlighter has been installed and deployed look under: System Settings > Farm Management > Manage Farm Solutions. If you see it there marked as deployed, then when you create a new column on a list you will get the option of setting the type to Pentalogic Highlighter.
Adding a Highlighter Custom Column to Your List
- Open the list or library to which you wish to add Highlighter
- Click Create Column
- This will open a new dialogue from which you can select Pentalogic Highlighter, which should be near the bottom of the column type list

TIP - When you add a new Highlighter column remember that each column in a SharePoint list must have a unique name, so even if your Highlighter column is intended to replace an existing column (eg "Priority") you will need to give it a different name (eg. "Task Priority").
Set Up
Now you get to choose between 3 different functions:
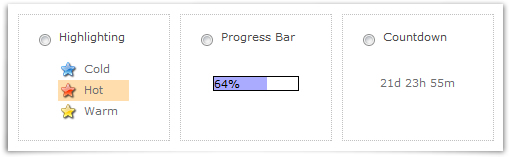
Highlighting – lets you highlight the text or background of a row or cell in different colours, or add icons from the supplied library, or of your own choosing.
Progress bar – lets you show progress towards a target, due date, or visualize a percentage column. You can color code your progress bars if you wish.
Countdown – lets you show the time difference between 2 columns, or between 1 column and today. Again, color coding can be applied.
The Rules
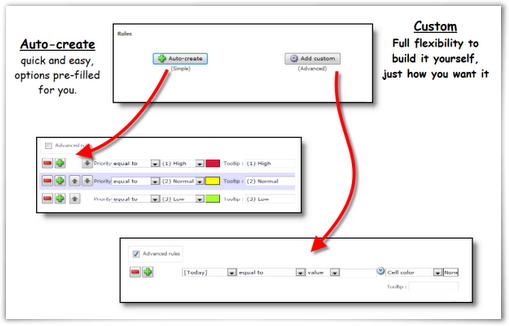
The Rules are how Highlighter tells the list how to behave. If you want to keep things simple, for highlighting, icons, progress bars or countdowns you can simply allow Highlighter to "auto create" setting things up in the most obvious way. Alternatively, you can choose to use the Advanced rules, and set things up yourself, from scratch. You will see that even if you choose to "Auto-Create" the rules, you can still edit them if you wish – for example if you think Highlighter has chosen and offensive color scheme you can change it! You may find that going with the "Auto-Create" settings then editing them, is the best way to learn how the rules work.
Highlighting
You can use color in either the cell/row background, or text. For this example we are going to highlight a cell.
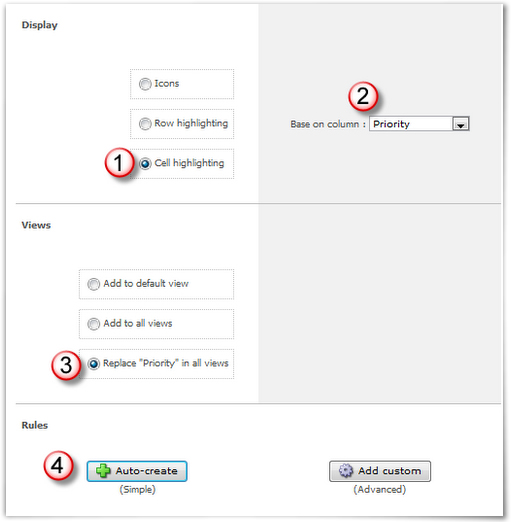
- Choose cell highlighting
- Choose the column you wish to highlight on, in this case the Priority column
- Choose where you would like your new Highlighter column to appear, in this case we are choosing to replace the "Priority" column in the view – this will put the new highlighter column in the same position in the view that Priority was before
- Click Auto-create
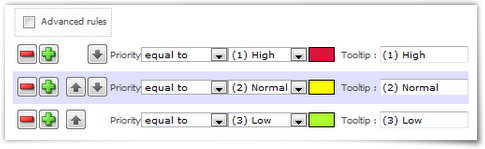
Here the rules are all set up for you, so you can just click OK and you’re done.
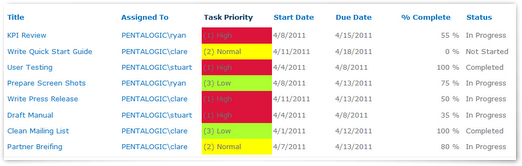
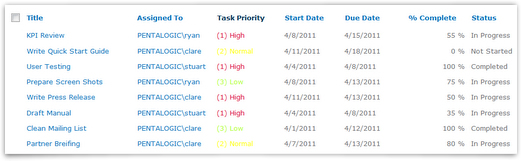
So in this case the pre-set rules have produced a rather ugly result. Let’s go in and change that with the advanced rules:

You can see we have lots of options here, but for now just change the row highlighting to text color, which should be a bit less offensive to look at.
TIP – though you can use the advanced rules to set up more than one feature using just one Highlighter column you can add as many SharePoint Highlighter columns to one list as you want.
This should be enough to get you started and the principles for adding icons, progress bars and countdowns are very similar.
Find out more:
