
Other Options
This section of PivotPoints configuration toolpart allows you to specify how the Add New Item link and Export to Excel options work and Crop the row and column labels.

Add New Item link
You can add a link to PivotPoint to add items directly to your list. You can choose from :-
- None
- Bottom - At the bottom of web part
- Caption - In the Pivot Tables caption (not applicable if you are showing the chart only)

PivotPoint Caption - Add New Item and Excel Export
Export to Excel option
You can export the Pivot Table to Microsoft Excel 2003+ for further analysis & reporting. You can choose from :-
- None
- Menu - In the web part menu
- Caption - In the Pivot Tables caption (not applicable if you are showing the chart only)

Web Part Menu - Excel Export
NOTE - After clicking on Open (or Save then Open) if the file opens in an new tab in Internet Explorer rather than Excel then you will have to save the file, then open Excel > File > Open and select the file.
Print Button
You can choose to show the print button on the menu, on the Caption, on both or neither.
Note - this was added in version 3.0.5
Crop Row/Column labels
You can crop text out of the row and column labels using these options. This is useful for situations where you have very long labels such as when you've added extra information into the labels to control the sorting.
For example SharePoint's Task list template uses a Priority column that has the following values - (1) High, (2) Medium & (3) Low - to enforce a sensible order when sorted alphabetically. If it wasn't for the number at the start of the status then alphabetical sorting would list High, Low, Medium.
This trick is often used when sorting dates - e.g. we want an order of "Jan 2011, Apr 2011, July 2012" instead of "Jan 2011, July 2012, Apr 2011" so we can add "YYYY-MM" to the front of the label to enforce the correct order, for example "(2011-01) Jan 2011, (2011-04) Apr 2011" and so on. For an example of this technique see the FAQ - How to drill down on Month and Year.
These sorting prefixes can be ugly though, so PivotPoint allows you to crop them them out.
- "Between ( and )" will turn "(1) High" and "(2011-01) Jan 2011" into "High", "Jan 2011"
- "Before - " will turn "1 - Not Started" into "Not Started"
- "After - " will turn "1 - Not Started" into "1"
Show Top N Rows or Columns

If you are sorting by the Total row/column then you have the option to show only the Top N rows or columns - this can be useful in cases where you may have a 'long tail' of data that you don't wish to display.
For example given the following, the vast majority of revenue comes from 2 products (Bottle-o-matic and Can-o-matic) :-
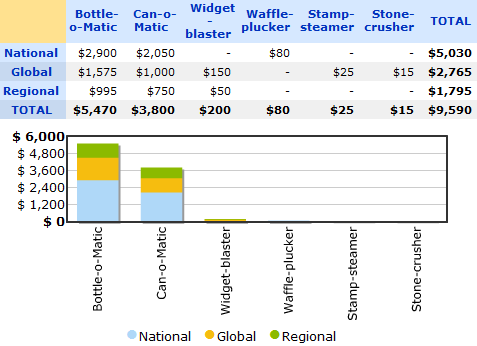
We can choose to display only the top 2 Columns (products) and group all other sales into "Other".
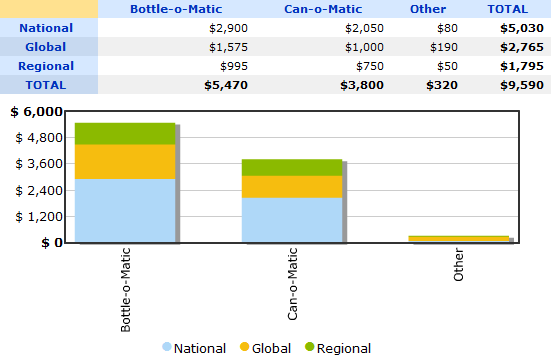
Note - this feature is new in PivotPoint v2.2.3 and will only be enabled if you are sorting by the Total in the main Configuration Options :-

Tip - if you want to show "Bottom N" records rather than "Top N" then just set the sort order to Descending as well.
